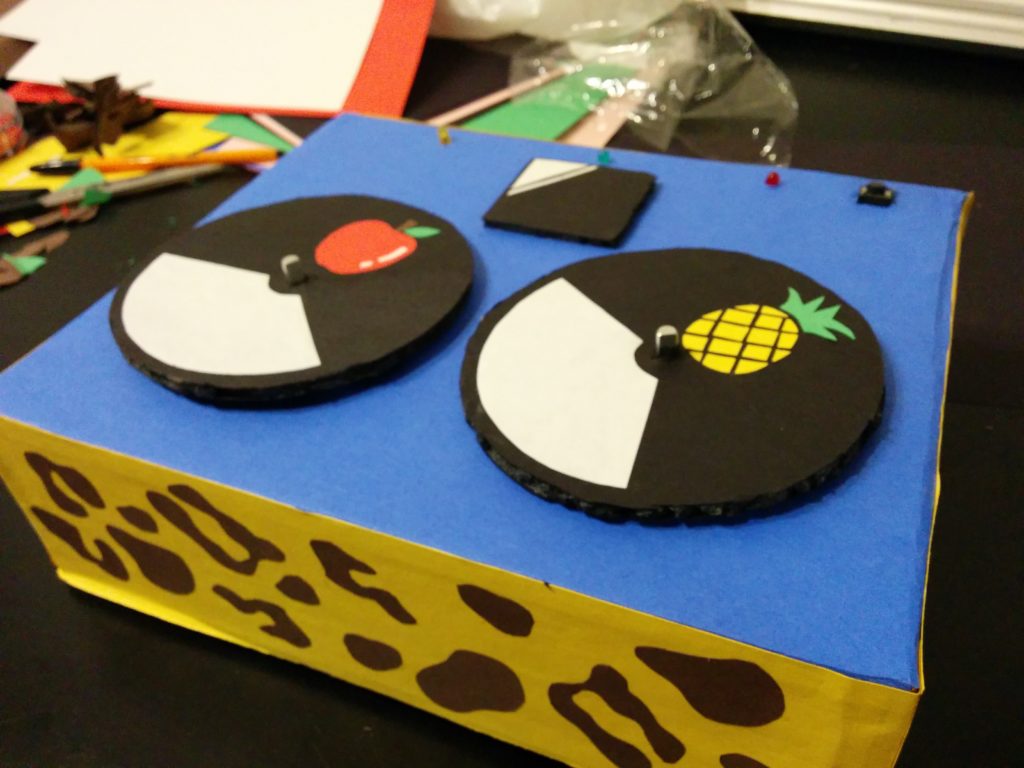
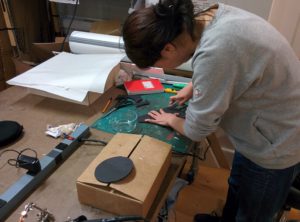
I was paired with Jinhee Ahn to work on our midterm for PComp. We had a brainstorming session about what fun ideas we could bring to life, and Jinhee had the idea to create tiny turntables to control music of some kind. But what songs? She thought of Pen Pineapple Apple Pen.
At first we laughed, but thought that it might actually be fun to make a game out of it. Maybe this was more like a game, where you input pen, pineapple, and apple all in the correct sequence. Sort of like a game of Simon, or Rock Band. But you were allowed to control the pace, where you are guided to learn the sequence of inputs but can do so at your own pace.
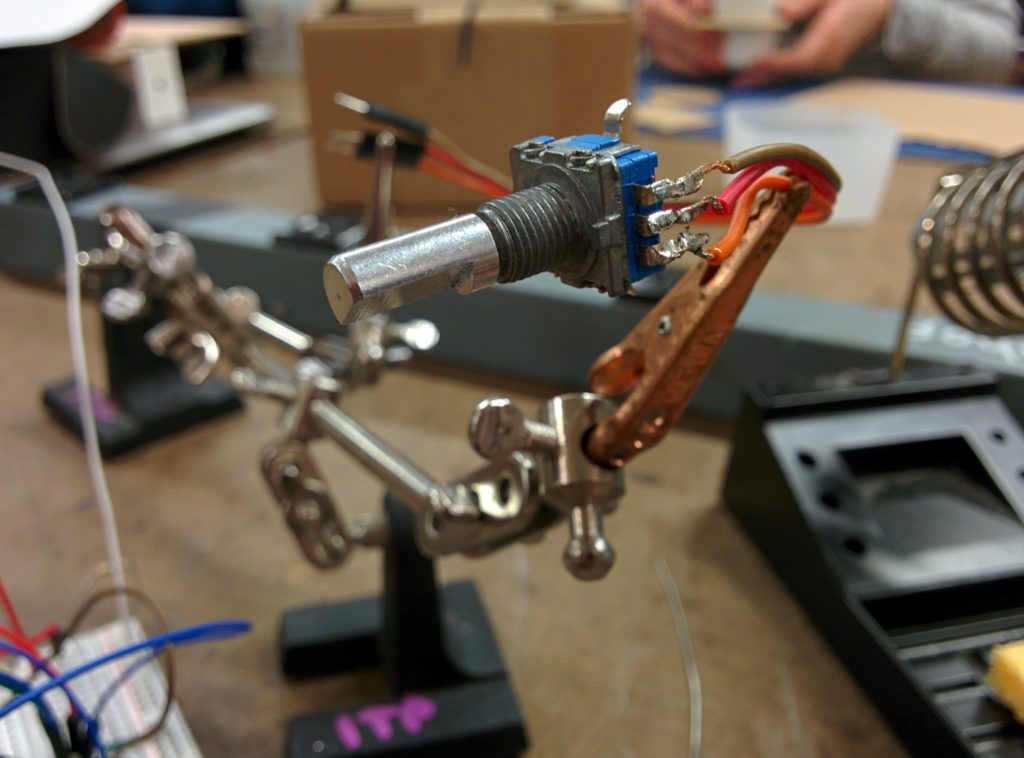
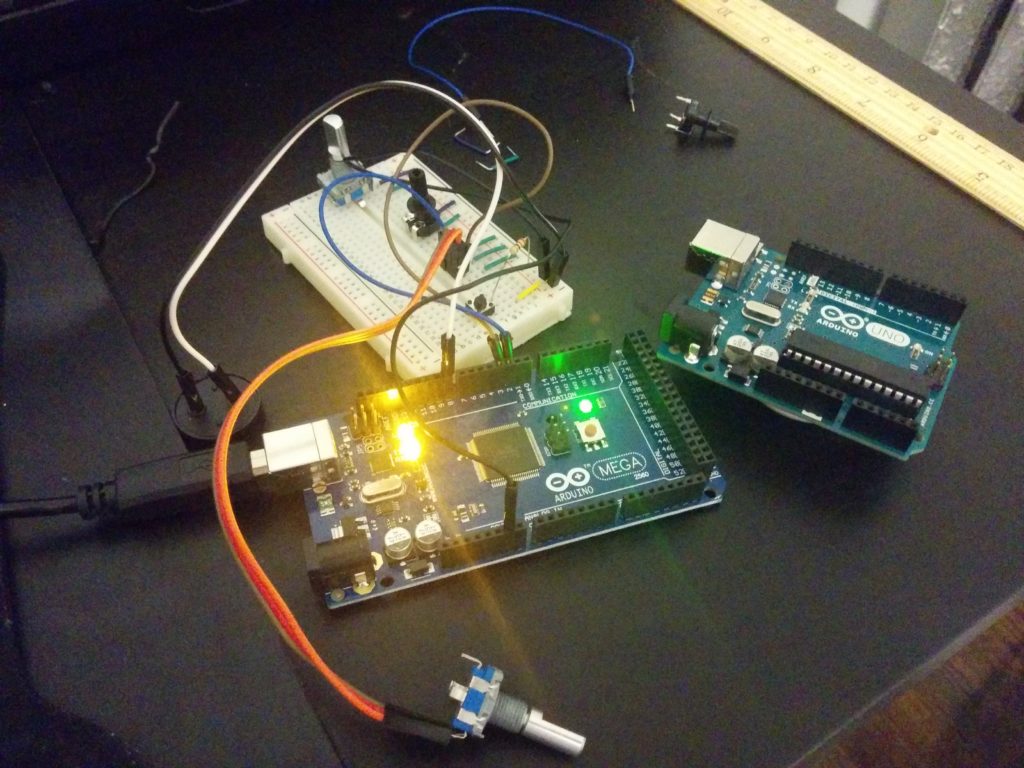
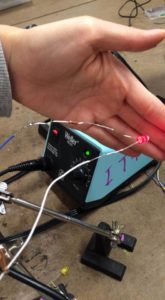
We decided on rotary encoders for the turntables, since we wanted to be able to fully spin them forever like you would a real turntable. This became tricky, because working with encoders is different than a normal potentiometer knob, even if they look similar. The example code that I found (much credit to the bildr website) and many others like it seemed to guide me towards learning about “interrupt” pins on the Arduino.
Interrupts are great! Interrupts are useful! According to the bildr website, they should be considered “magic”! I’m in. But not so fast! It seems that an Arduino Uno only has 2 interrupt pins, and I need two for each rotary encoder. Time for an upgrade. The Arduino Mega has 6 interrupt lines, solving my input issues.
To split up the work load, I did most of the coding. My first task was to find a way to play PPAP on the Arduino. Fortunately for me the internet is deep and weird.
On YouTube someone was kind enough to load a chiptune cover of PPAP, played within an oldschool “tracker” audio program. This displays the notes being played. Then I could transcribe them into MIDI notation using an online audio program. If you feel like downloading my translation of an internet meme into a MIDI file, you can grab a copy/play/remix it here:
*Phew!* Lots of translations in a row, but it worked.
The program itself knows all the notes, and plays them back when the appropriate instrument is activated. A light above each input indicates which one you should be using. This means I had to keep track of the notes, the position of each note in the song, and the “parts” for each song that would correlate with each instrument. So, “I have a pen” is four syllables, and hence four notes. You will need to hit the “pen pad” (a piezo sensor) four times to step through that part of the song. Then the next part is “I have an apple”. In this case, at the start of this phrase the current position is on the fifth note, which has been manually assigned to the second “part” of the song. When in this part, a different LED is activated, and the “apple” record is the only instrument that can move the music forward.
It is amazing how much you can take for granted when coming up for an idea for a program. “Oh, its the notes and then you’ll just say what parts of the song…” Then you have to actually code it, breaking down all the discrete little conditions you gloss over when thinking of how something should work.
Additionally, this was a good learning exercise for coding Arduinos specifically. Working a lot in p5, I was easy to take for granted something like the array.length() property. Arduino does not work that way, so the number of notes was manually counted out and hard coded as it’s own integer.
Link to my currently messy code can be found here.
Jinhee’s graphic design experience really made a big difference once we were all done. Even as a prototype, going the extra mile to give something the right look can be worth it. Our device is now clearly a fun, whimsical toy.
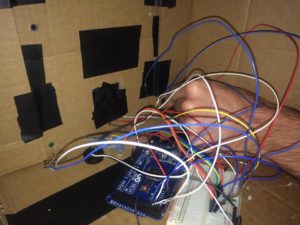
There are some interesting UX revelations here, and certainly some general knowledge that will be kept when considering future projects with Arduino. But I think for a prototype, this is a good proof of concept to try out the ideas we were going for.
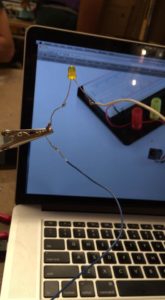
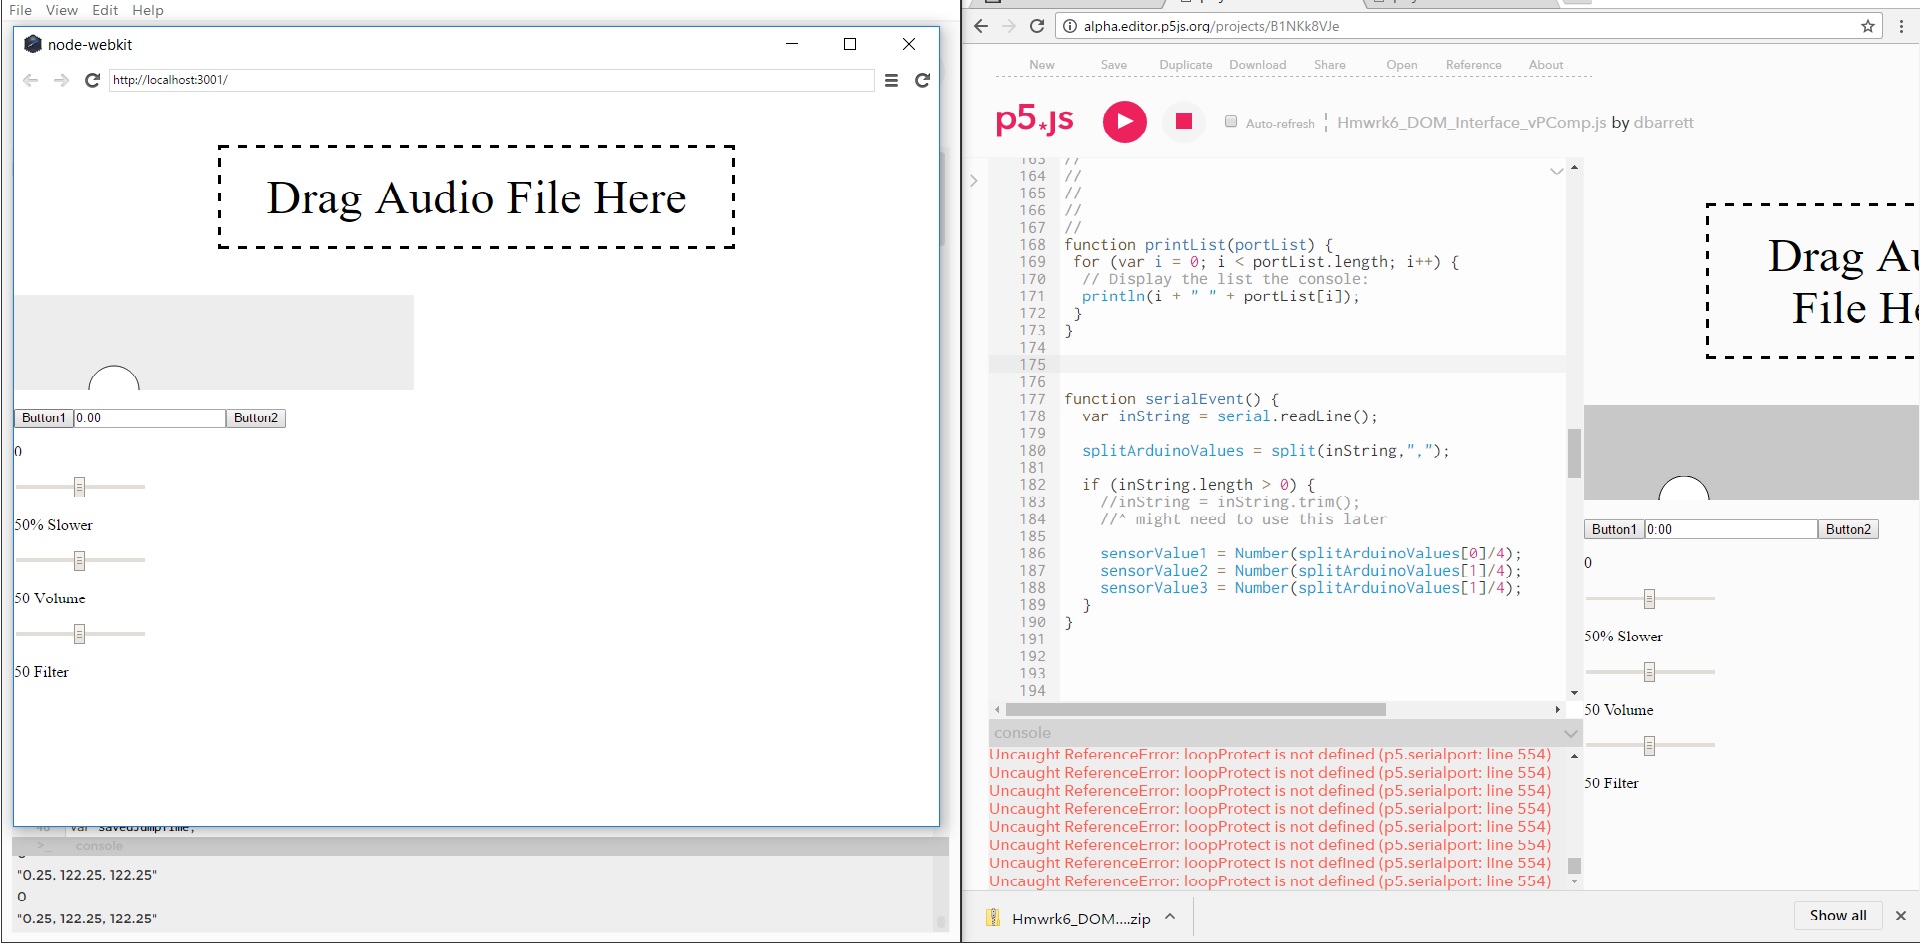
We’re breaking out of canvas land and into the DOM! Our homework this week involved using the HTML DOM with our p5 programs, getting and sending values on a webpage (outside of the usual canvas element we’ve been using so far).
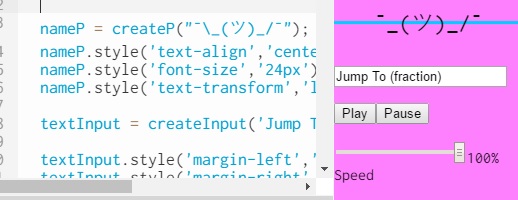
I’m still having fun exploring the p5 sound library, and DOM control was a great way to logically add control and feedback to a music based program. I’m really impressed with p5’s stretching of sound, and decided to make a Vaporwave themed music player.
(Embedding this one was a bit fussy. Maybe because of all the DOM trickery? Worth asking about in class.)
Drag a sound file that is on your computer onto the indicated area and the file will load. When the file is successfully loaded, press the play button.
Certain aspects of layout are just so much easier in HTML, it was a great reminder to get back into it. Though there were some issues with centering some of my DOM elements, the advantages to really working the DOM are apparent for larger scale and multi-page p5 programs. I was able to implement drag and drop for file loading, change the color of elements based off of the amplitude of the music, and create sliders and buttons quickly and easily. Even funny stuff I hadn’t even thought of was available. Depending on the amplitude of the sound, the title of the sound file being displayed will switch from lowercase to uppercase. (CSS style ‘text-transform’,’uppercase’ for the curious)
Knowing that I can CSS style everything is even that much better, keeping in mind future edits and changes that might occur in a program. In this case, I used some Google Fonts to spruce up the Vaporwavey feel of the design. And all of this isn’t at the expense of the canvas sketch itself, which shows a waveform of the sounds currently playing. This gets embedded in the background thanks to a z-index property. In the requisite pink and blue, of course.
I started out with music more ambitious goals involving the p5 sound library, which were thwarted at nearly every turn. But my little Vapor-Player (…um…working title…) has captured my heart, and I will be revisiting it as I get more adept at sound manipulation in the browser.
The only question I have left is… what happened to shrug emoji’s right arm?!!?
Shrug emoji!! What did I do? Oh GOD I’m a monster!!!!
Editors note: When asked for comment about the incident shrug emoji offered no statement, but did shrug.
This week we were asked to continue the work that started in synthesis, and use serial communication in order to control a program we have made for Intro to Computational Media. I got a little excited about what I’ve been trying to make for my current homework, so I decided I was going to try and co-develop them.
I’m having a lot of fun playing around with the p5.sound library, so I decided to try and make a physical interface for my program. Two sliders and a button. One slider controls volume, one controls the rate of playback, and the button triggers a sound to play.
Really, I wound up re-using most of my code from synthesis, on both the arduino side and the p5 side. Just toss that in there and…
…not so fast!
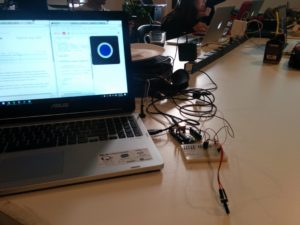
I have no idea why this was happening, but I was crashing the online p5 editor with my arduino-controlled program. Our original synthesis program was running just fine. But this new one I made seemed to create strange errors and make the browser hang. Though, for whatever reason, this did NOT affect the p5 application. As you can see, that one is running and receiving data just fine.
Spent a little too much time trying to trouble shoot that before just sticking with the app as opposed to the web. I will definitely want to show this to some p5 people to see if they know what might have happened. But I had a working program, even if it was on a different platform.
Holding down the button re-triggers the playback as fast as p5 can handle, which is usually a glitch for certain kinds of button based inputs. But in this case, made for more of a tonal interaction as opposed to percussive. In the sense of performative capabilities, I thought this was the better choice for now.
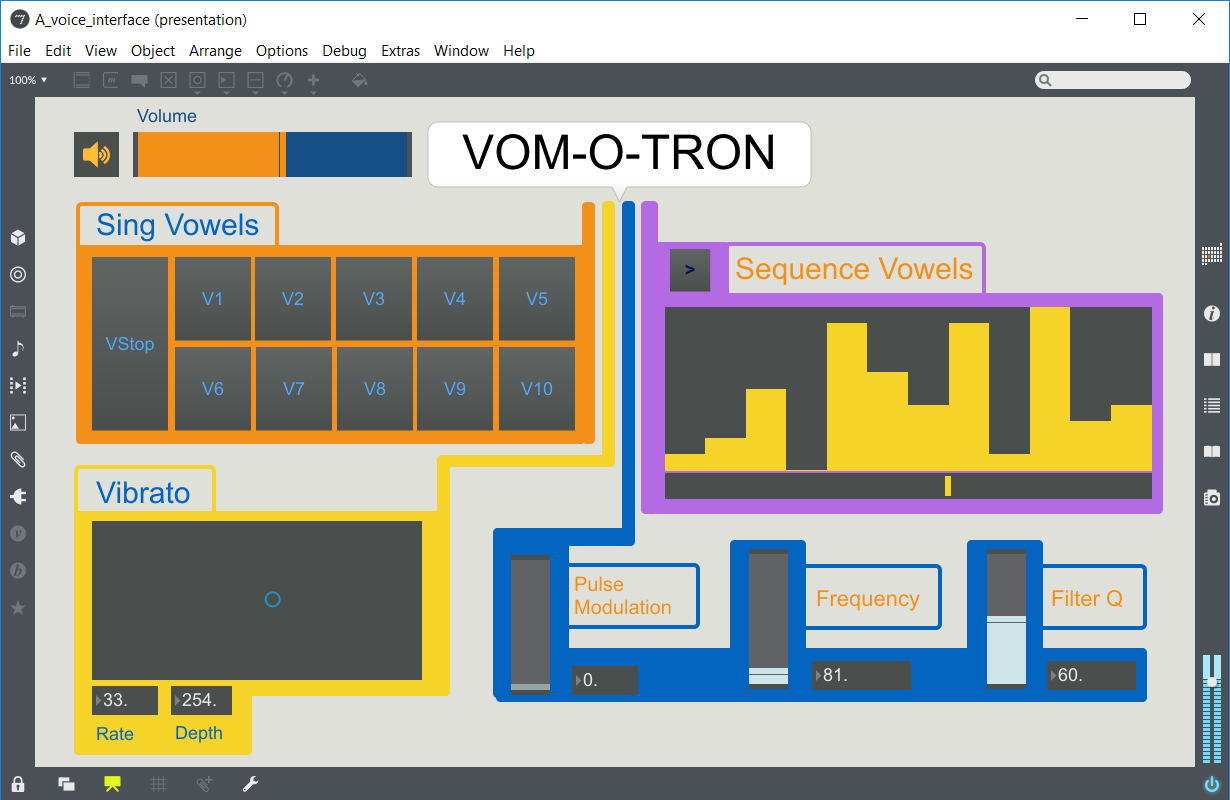
After a week off from class, we’ve returned with some prototypes. Luke started showing the class ways to get started with Max MSP, using webcam control of audio for a first example. Then he emailed us the guts of a synthesizer, the Vom-o-Tron! It is a formant synthesizer for creating human-like vowel sounds. It sounds a little creepy, like a robot vomiting, but was fun for making crazy noises. Our task was to make an interface for it.
It is still a work in progress, but in general I had some fun using it. Since Vom-O-Tron is a whacky name, I decided to go with a fantastical, cartoonish skeuomorphism. The synth’s name vomit’s its content onto the screen in a multicolored rainbow mess. I’ll let you play with it. Download link here:
Just to note, the sequencer is a bit… broken. And just in time to perform it in front of class for everyone! Projects always behave best at home, right? Notes for getting it kick started again can be found in the comments next to the sequencer while in edit mode.
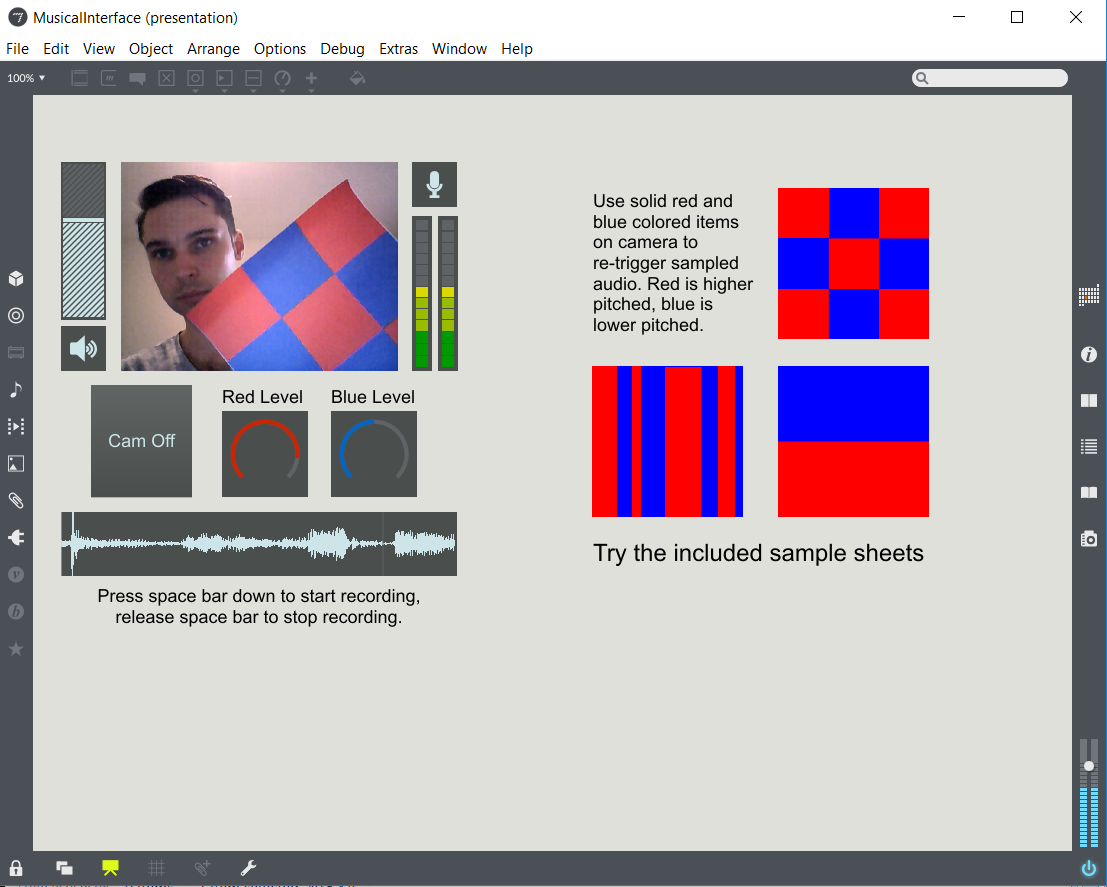
I still wanted to use some of the webcam work we had done in class. Matt Romein held some Max workshops at ITP, so I rolled in some of the things I learned there. This musical interface records from your microphone when you press the space bar. Then the web cam watches for the color red and blue. The sampled recording will playback at higher speeds when it sees red on the screen, lower speeds when it sees blue. The screen is split into a 3×3 grid, so moving colors around will playback at different rates as well.
I made some printouts to play with the functionality. I’ll include them in the download zip as well:
We are starting to get towards the middle of the semester, and have added more foundational building blocks to the programming repertoire. This time around, it is working with objects and constructors. Getting used to “the Javascript way” has been a bit of a challenge, and I’m glad I get to practice the implementation even if I’m already familiar with the concepts.
This was also an opportunity to use p5’s sound library, which I have been very curious about. Getting my objects and constructors all set allowed me a lot of flexibility in terms of creation and playing around with ideas. I wanted bouncing balls that played sounds when they hit the ground, and the object oriented approach let me easily play around with their properties and behaviors, including the sonic ones.
In this sketch, you click to create a ball. The ball will fall and bounce, making a noise. Press keyboard buttons 1 through 4 to change the kind of ball you want to create.
Lots of fun! I love sound interaction that is playful and a little unorthodox. I’m really impressed with p5’s implementation of it, and can’t wait to dig in more.
There were some conceptual questions I had to ask myself. Right now, the balls all more or less behave the same. They could easily be one soundBall class and then have their “type” passed to them to determine behavior. But I had the feeling that I might want to make their behavior drastically different from one another in the future, so I decided for now to make them all separate kinds of objects.
This made my displaying and updating routines in the main sketch a little repetitious. I was wondering if an elegant solution might be having an array of arrays, with each “second level” array hold all of each kind of ball. But then I was wondering if it is bad form to have arrays with mixed types of variables inside.
There were also some quirks in regards to getting the sound going, which might be out of the scope of the class for now but I will definitely want to pursue later. All in all, though, a fun time and whet my appetite for making more advanced objects and really working the sound library.
Synthesis
And then there was Synthesis! I’ve gone over this in my PComp blog as well, but will repost here as well.
This past week we had our “Synthesis” session: the combining of the things we have learned in Physical Computing and Computational Media. In short: getting our P5 sketches to talk to our Arduino. Fun stuff!
I was partnered with Chris Hall, who had an awesomely trippy sketch that we thought would be fun to control physically. Her original program triggered animation on clicking, and we managed to translate that to an Arduino button press.
We were pretty happy with ourselves, pressing away and showing off our work:
We are blowing minds on the floor!
Tom Igoe saw our work, complimented us… and promptly told us to add more. His advice to use p5’s split() function was key information, and saved us a lot of time in figuring out how to implement two inputs. Though even then there were some issues in formatting the serial communication coming out of the Arduino. At first I had done some string concatenation on the Arduino side in order to send out comma separated values, but it was getting turned into jibberish. Using individual Serial.print() commands, then ending everything with a Serial.println() seemed to do the trick. We were now able to press the button to start the animation, and then use a potentiometer to change the hue of the colors in the sketch.
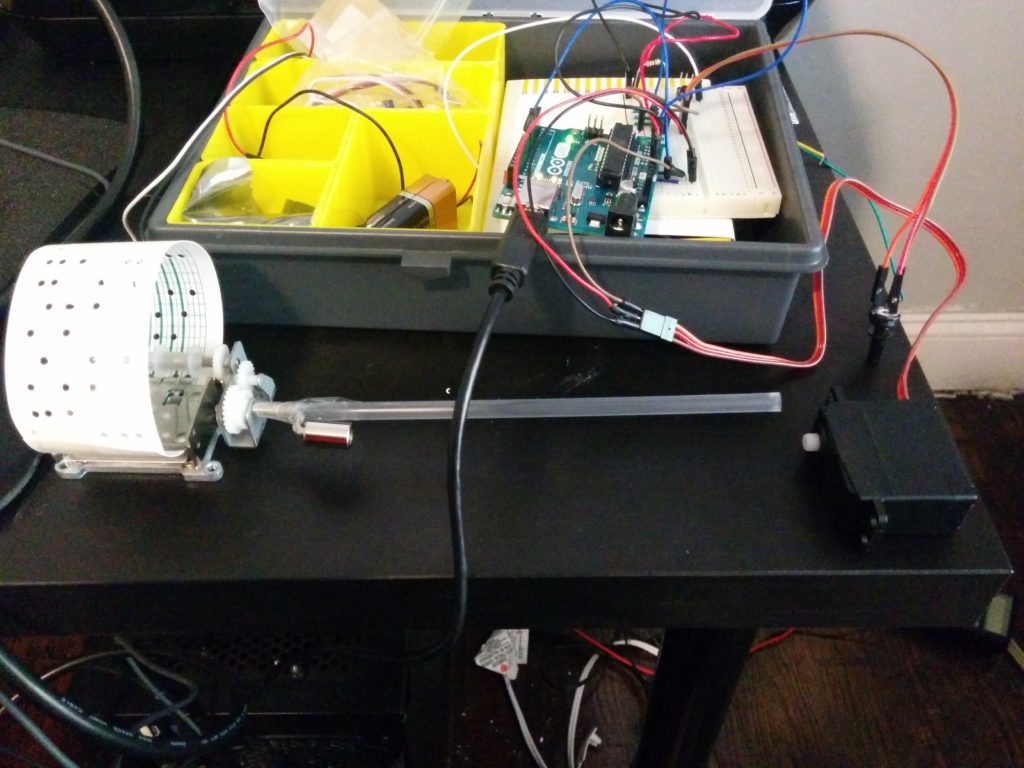
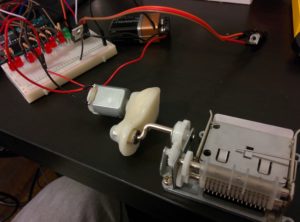
We were also encouraged in PComp to work on some older labs to fix issues or try to make them better. I decided I wanted to take another crack at my automated music box. First things first, I played around with the paper score, specifically cutting and taping it so that it would turn into a loop. Then, I went to buy some new gear.
A new motor! A servo, actually. I went to Tinkersphere and found a full rotation, high torque servo motor. I won’t fill up with blog with documentation all of my failures, which included much cutting of cardboard, haphazard usage of a box cutter, and way, way too much Scotch tape. But just trust I was still having issues making this little moving machine translate it’s energy to the music box. That is when I had an epiphany…
The blank nub of the servo was the perfect fit for a plastic straw (almost). With even more questionable box cutter usage and now only modest amounts of Scotch tape usage, I crafted something effective:
Almost. Not all the way there, but much closer to where I have been. It seems like the motor gear would eventually strip the inside of the straw, lose it’s grip and prevent the moving action. But in general, the more direct, straight line seemed to perform better than my previous plastic blob. I’m going to be starting Introduction to Fabrication in the second half of the semester, and think I’ll keep this project on the back burner until I can craft some proper machinery to make it truly groove along. But it was nice to see the fundamental proof of concept on display (if only briefly).
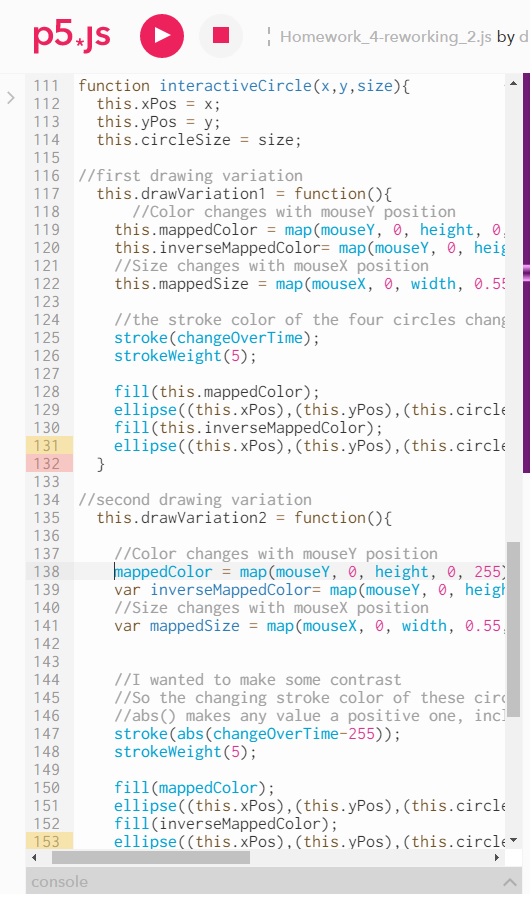
For our fourth homework assignment, we were asked to re-work an old homework assignment by adding functions, objects, a function that returns the results of a mathematical operation, and using objects. I decided to also implement the ‘bonus’ goal of using a function inside of an object.
It was really soothing to go back and re-organize everything in this sketch, almost like a spring cleaning. Adding a function for the lines in the middle allowed me to play around with the amount, and making the circles into objects allowed me to tweak all their behavior as I needed without the endless copying and pasting. And revisiting everything allowed me to create an oscillating fading effect instead of having abrupt jumping.
I decided I wanted to work with adding functions into an object, since I haven’t had much in-depth experience with Javascript specifically and was curious about how this was going to work.
Speaking of this…
So many this-es! Theeses? Thisii? I had to use ‘this’ a lot. This felt strange to me coming from other programming languages. From example code in the book, it seems like these are necessary, and perhaps functions as a kind of in-object specific local variable. Still, it seemed odd to have to specify “this” all the time. Feels redundant. Then I was realized I was using it when I might not necessarily have had to. I don’t want to jump ahead in class, but would like to talk about the best ways to use ‘this’, and maybe some ways that we can avoid having to type it out so much.
Looking forward to moving onward into Javascripting, and the synthesis class on Friday to start taking these skills into the Arduino realm (and visa versa).
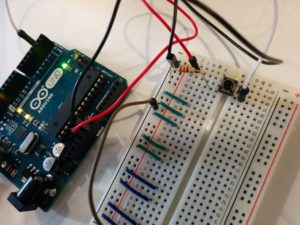
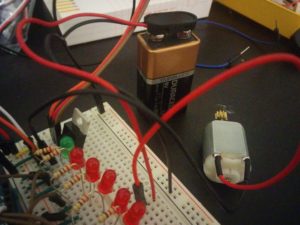
This week’s class discussion and accompanying lab revolved around analog output from the Arduino. My only experience with this to before was with fading LEDs, so I was excited to start moving motors and making noise!
I decided I wanted to build off of my last lab (…didn’t have the heart to pull out all those LEDs just yet…), and add new features to what I already had. When looking for inspiration around the web for using motors with and Arduino, I noticed that some breadboard diagrams used a diode for protection but our material did not. It seems like the transistor in our kit has a diode built in. Might be a question for class: is this the exception or the rule when buying transistors? In any case, having one built in saved me some space on my already cramped circuit board.
The knob pot interacts with the light in the same way as the previous lab. When there is no light, we are all the way down and when the green LED is lit we are at full value. Let’s take this motor for a spin!
I know it is a simple thing to do, but it really is a cool feeling making things move. As you can kind of see from the light (placed my hand there on purpose as to not blind the camera), and hear from the motor, the motor is moving.
An idea was forming, so I quickly moved onto adding some noise. Using the tone() function examples along with the pitches.h header file was very straightforward.
What is that white blob in the video? It is a substance called prototype plastic that I picked up a few years back at a local Makerfaire. Initially it comes as little plastic beads, and if you let it soak in extremely hot water for a few minutes it becomes malleable. You can mold it into whatever you want, and when it cools, it hardens again. It is useful stuff! Pretty strong, but also reusable. I had an idea I wanted to try:
I have a little hand cranked music box that uses music sheets that you can author yourself by using a special punch hole tool. What I wanted to do was link the mechanical action of the DC motor to the crank of the music box. So I molded this “adapter” that held both shafts tightly together. Long story short, I couldn’t get it to work. I could make the motor spin with the plastic on it, but at the end of the day I just don’t think the motor was strong enough to make the music box crank spin. Certainly opened my eyes to the potential complexities of mechanical action. Turning the music box with your hand is a smooth and reliable interaction, and I just assumed this little motor was up to the task. Apparently not so. Definitely would like to talk in class about the process of picking motors, and building or choosing more… professional “middleware” to put between a motor and an object (as opposed to my freaky plastic blob).
So with that little experiment aside, I decided to implement the other half of my concept. Make the digital noise increase in speed with the potentiometer. I love making crazy noises, so I had a bit of fun with extremely speeding up the example sequence:
I have some ideas on how to make this a performative musical device as I grow my physical computing skills. Stay tuned. In the meantime, I’ll be trying to get “shave and a haircut” out of my head after listening to it over and over again. Thanks, Arduino example code.
For our assignment, we were given a few terms collected from the book Universal Principles of Design. I was given the following phrases to explain and analyze:
Fibonacci Sequence
Golden Ratio
Most Average Facial Appearance Effect
Normal Distribution
Most people are familiar with Normal Distribution as the “bell curve” when plotting values across across of a distribution. In the book, this example shows average height among men and women. We might have come across the terms in standardized testing or being graded in a class. It is a statistical approach of measuring variance from the average. In a normal population, approximately 68 percent of the population falls within one standard deviation of the average, a plus or minus of 34.13% away from 50%. These percent values, or percentiles, help judge the distance from the “normal” or “average” value. If 50% is average height for a man, then someone who is 99% is much taller than average, and 1% much shorter.
The Most Average Facial Appearance Effect (or MAFA Effect, here I will call MAFAE) builds off of this understanding of calculating what is average. The MAFAE asserts that, “people find faces that approximate their population average more attractive than faces that deviate from their population average.” In relation to MAFAE, “population refers to the group in which a person lives or was raised,” and “average refers to the arithmetic mean of the form, size and position of the facial features.” When we think of a perfectly Normal Distribution, when all values are averaged you wind up in the middle with whatever value is at the 50th percentile. In a similar approach, a visual description of the MAFAE blends all faces together to depict the most “average” face, which is also described as most attractive.
With this kind of visual averaging, the resulting faces are usually more symmetrical, which has found to be a valued when judging attractiveness. Further, the MAFAE is used to explain why people may find members of the same race attractive. This is justified by what is speculated to be a genetic, evolutionary preference, and perhaps some innate fear or distaste for the unfamiliar. According to MAFAE, unfamiliar groups can eventually become familiar, and henceforth the “cognitive prototypes are updated and the definition of facial beauty changes.”
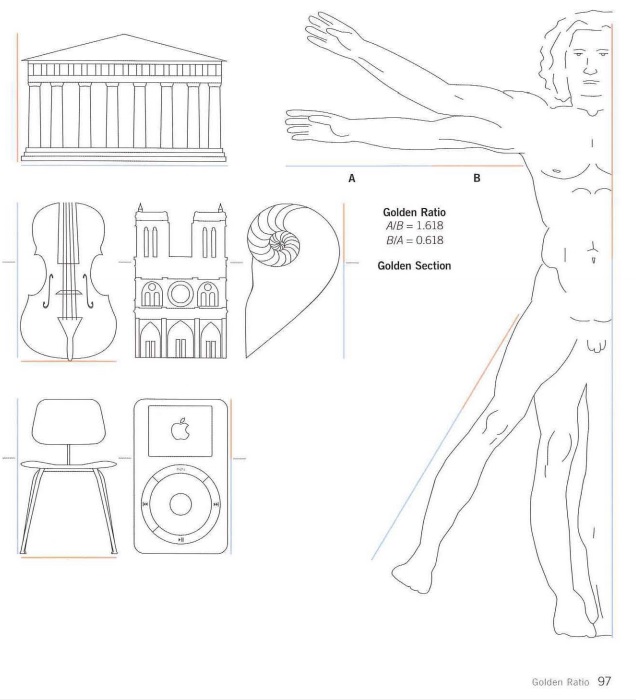
This preference for the natural extends to our next two terms, Golden Ratio and Fibonacci Sequence. The Golden Ratio is defined as the ratio between two segments such that the smaller segment is to the larger segment as the larger segment is to the sum of the two segments. This is larger segment is 0.618 compared to the sum of both equalling one. This is a little dense to type out and read, but can be understood much easier visually.
These are Lidwell’s examples from Universal Principles of Design
Luckily, there are many depictions of this ratio being examined in relation to many beautiful man made and natural objects. Lidwell cites that, “the golden ratio is found throughout nature, art, and architecture.” Along with Mondrian and da Vinci paintings, pine cones, seashells, and the human body are used as examples of things that possess this Golden Ratio. In fact, it is the cover of the book itself.
These things are said to be subconsciously preferred, appreciated and found beautiful. Eventually, using this ratio became a conscious strategy, and part of a template for all kinds of works and designs. Lidwell suggests exploring golden ratios in design, “when other aspects of the design are not compromised”.
A similar phenomenon of intrinsic aesthetically value is the Fibonacci Sequence. A Fibonacci Sequence is a sequence of numbers in which each number is the sum of the two preceding numbers. An example being 1,1,2,3,5,8,13. Lidwell cites the “seminal work” on the Fibonacci Sequence, “Liber Abaci” from 1202. Saying, “ubiquity of the sequence in nature has led many to conclude that patterns based on the Fibonacci sequence are intrinsically aesthetic and, therefore, worthy of consideration in design”. Much like the Golden Ratio, the Fibonacci Sequence can be found in nature: the number of flower petals and bones in the human hand. Also similarly, after identifying this pattern, artists and designers started consciously using it in their work. The Golden Ratio and the Fibonacci Sequence are closely linked: the division of any two adjacent numbers in a Fibonacci Sequences yields an approximation of the golden ratio. Earlier on, it is less accurate, but as the sequence increases it becomes more so.
Themes, and my take
The grouping of these terms points to ideas about what is considered average, normal, natural, intrinsic, and perhaps some kind of concept of ‘perfection’. We want to be able to measure these things, thinking of Normal Distributions, which can be implemented in grading or formulation of public policy. We want to be able to model these things, thinking of a perfectly beautiful face. And we want to believe in a kind of mystical property for these things that we want. The subjectivity of beauty meets the objectivity of math with the Golden Ratio and the Fibonacci Sequence. Humans simply just prefer these things, and even though we don’t know why, there is a kind of mathematical code that points the way to replicating it.
To Lidwell’s credit, he qualifies and hedges all of these terms. He notes Normal Distribution is a statistical model by which to analyze measurements, not an inherent truth. This is in addition to reminding us that with design, we should actually pay more attention to the outliers, the 1% and 99% populations, in order to closer make a design that is effective for 100% of the population. This sentiment was echoed in the Objectified documentary with the designers trying to create gardening shears.
The Most Average Facial Appearance Effect is peppered with qualifiers, “the effect is likely the result…”, “…it is possible a preference for averageness…”, “If this is the case..” and so on. And the Fibonacci Sequence and Golden Ratio have outright warnings. Lidwell cites that while there have been some studies that purport to show that people aesthetically prefer things that have these traits, these studies have also been challenged. But it seems that hasn’t prevented them from being adopted and spread among our zeitgeist.
In fact, in researching these things, I discovered a kind of online subculture of people complaining about the Golden Ratio and Fibonacci Sequences in popular culture.
Part of this seems to be in reaction to a hyping up of both theories. “Fibonacci Numbers are found in nature,” seems to have been rounded up to, “THE NUMBER OF PETALS ON A FLOWER ARE ALWAYS FIBONACCI NUMBERS OMG!!!!” (when this is demonstrably not the case at all). This can be attributed to a misunderstanding of the theories and maybe some opportunistic hucksters looking to sell books and get advertising clicks, but the instinct to even amp up these concepts in the first place is very telling to me.
My take is that all of the terms I was given can be good general guides when looking for inspiration, searching for possible themes, and coming up with rudimentary methods of analysis. But there is a danger of feeling that they are inherent. And that danger is likely, because if pop culture around these concepts is any guide, we crave this objectivity and rock solid “normality”.
Using any statistical method of analysis, like Normal Distribution, can be dangerous if you aren’t paying attention to how you are collecting your data. Which can mess up your Most Average Facial Appearance Effect model of the “most attractive person,”: how many people did you analyze? From what places? Are they considered “familiar” or “unfamiliar” to your target audience? How would you know? And then if you have drawn your conclusions from less than ideal data, methodologies, and theories, this can keep you only focused on things that fit your conclusion. You only notice flowers that have Fibonacci petals, and don’t pay attention to the ones that don’t. Then after a long enough time, you wind up taking these theories for inherent facts. That is until you notice something that makes you question the whole thing…
Final verdict: Don’t throw the baby out with the bath water. But keep these concepts in context. Despite popular depictions, try to use these as design tools, not rules.
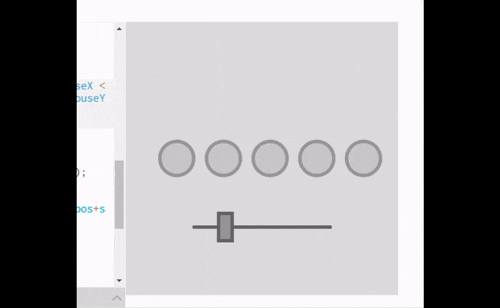
For our week three homework, we were asked to create an algorithmic design with simple parameters that could be controlled with a rollover, button, or slider made from scratch. I was paired with Lindsey, and having code experience I decided that I was going to first try and code a slider from scratch from memory. I’m used to having slider code readily available from previous works and code examples, so I thought it might be good to flex those long dormant brain muscles.
Creating a slider means doing hit detection inside of the “knob” of the slider, and then adjusting the position of the knob while “dragging” it. Is my mouse clicking? Is my mouse inside of the box? If so, move the knob to the position of the mouse. Restrain its movement to the X axis, and prevent it from going outside the bounds of the slider.
Not so fast!
No matter what your level of coding skills, you can always forget something. Which, in turn, the computer never forgets to remind you of. The ultimate game of “Simon Says”. We take our lovely sliders for granted, don’t we? They feel nice and intuitive. But if you only code the logic to say, “…when clicked and inside…” and then you move the mouse outside of the slider knob it will stop moving. This makes you appreciate how fast you can move your mouse during average use, and how little your mouse is literally “on” the knob as opposed to briefly clicking it then taking off in a direction.
The solution is to explicitly set the state of the knob, assigning a “clicked” or “currently dragging” status. Then the logic will let you move the knob with the mouse, even if the mouse is technically outside of the knob’s graphical boundaries.
After doing this, I then decided to take a look at the example UI code for the slider. It seems that code is all based off of the mouseClicked() and mouseReleased() functions, as opposed to mine which is based off of the boolean “mouseIsPressed” p5js variable. Need to remember to ask in class about the pros vs. cons for each approach.
Meanwhile, Lindsey was beefing up her skills with functions and for loops. She wanted to stick with the cat and mouse theme she has been working on, so after she made a cat and a bunch of mice, I tied everything together with the slider code and polished things up a bit.
We had a concept, and plugged the slider code in to execute:
We weren’t quite sure if this counted as truly algorithmic or not. I really wanted to randomly assign the colors of each mouse, but given the limits of the assignment and where we are in regards to the learning material, I was scratching my head in regards to finding an elegant solution.
I wound up adapting some of the GOTO10 code that had been posted by Dan Shiffman as inspiration. This gave us some fun animation and randomized mouse colors, but perhaps some other trade offs.
The code wound up being a bit hacky in the end; what Lindsey had made, my first attempts to modify it, implementing logic from the GOTO10 approach, further attempts to modify… but eventually we wound up achieving our vision (more or less).
It is a fun approach, but with certain limitations for sure. I have some questions about how the GOTO10 style can be refined, which I’ll be posting to the GitHub group.
Lindsey was a great team mate, and really grew her skills over the course of the week. It was an honor to be on the ever expanding, illustrious Cat and Mouse series.